

This manual covers both of the Lincoln Range of cottages. Please note that the cottages come with different accessory sets and slightly different architectural designs.
They are both 100% mesh :
LINCOLN BEACH COTTAGE DETAILS (Dark Hardwood Design)
Mesh LI = 135
Copy/Mod
Footprint = 35 x 41 (but variable)
Accessories Pack = 112 LI
LINCOLN COVE COTTAGE DETAILS (Light Pinewood Design)
Mesh LI = 135
Copy/Mod
Footprint = 35 x 41 (but variable)
Accessories Pack = 199 LI
WHERE TO BUY
Please see the links on the RIGHT
LINCOLN BEACH ACCESSORIES PACK


When you buy the house only set it comes with a basic accessories pack.
Accessories Pack LI = 112 (variable)
Most items are copy all are mesh
- Outdoor porch lighting
- Outdoor spotlights
- Hallway spotlights
- Kitchen spotlights and window plants
- Outdoor potted plants and copy/mod planters
- Extra deck with multi sit pool (new)
LINCOLN COVE ACCESSORIES PACK


This was the 2016 Relay for Life Home & Garden Expo Extra Accessory Pack, the standard pack (released after the event) is smaller:
Accessories Pack LI = 199 (variable)
Most items are copy and all are mesh
- Built in Pool
- Texture Change, Ivories Hot Tub plus cuddles
- Original Indoor Lighting
- Outdoor Spotlights
- Designer Egg Chairs
- Sun loungers
- Radio
- Rugs
- Outdoor and indoor plants
- Outdoor balcony
All mesh
OUTDOOR SPACE


- Wooden patio base
THE LAYOUT ~ COPY/MOD

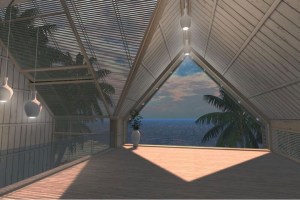
- 2 storeys with 5 different rooms/zones
- Living room and Kitchen
- Front lounge
- Bedroom
- Bathroom
- Outside areas
PRIVACY


- Privacy windows (via the texture control panel by the right side of the front door)
- Lockable doors – Simply touch and slide down the doors to open the operating menu. Then just follow the instructions to lock or arrange
WINDOW PRIVACY PANEL
You can change the windows (and the glass doors) to;
- White closed blinds
-
Semi open blinds
-
Glass or
-
Clear textures
WINDOW TEXTURE CONTROL ACCESS LEVELS
You can select 3 access levels of user, who may interact with the texture change script:
Level 0 – Everyone :means anyone who touches the control panel will be able to set the texture control menu
Level 1 – Authorized users :list of users must be specified. The list is saved in a notecard “:mptUsers” (without the quotes) in the control panel. This notecard is located in the silver control panel object. To access this prim – select build – choose edit linked – click on the light prim – go to contents. You will see the notecard there. To add specified names follow the details below. Add the name of each avatar who you’d like to allow access to the texture change menu. Each name MUST be written in a new line. Spell each name exactly as it is in SL including capitals – Beware of misspellings 😉 The owner of the object doesn’t need to be in the list if Access Level is set to 1 in order to have access to the menu. You an access this notecard by selecting the contents of the control panel.
Level 2 – Owner only: – only the owner of the object will have access to the menu.
OUTDOOR & INDOOR, LIGHTS/LANTERNS/LAMPS

Lincoln Beach
All lights come with 3 settings which are Hi/Lo/Off
Lincoln Cove Outdoor Lighting
The outdoor spotlights are linked to the main building. To turn on/off just touch one of the spotlights. Whilst any of the spotlights are attached to the main house it will turn on and off as a group of lights.
If you would prefer to operate them individually, carefully de-link the spotlight and leave in place. You will now be able to turn it on as a standalone light.
Making The Most of Lighting
Lighting is very important in-world and it makes a big difference to how ‘real’ things appear. If you don’t have the right settings on your viewer you won’t see the effect of lamps and candles.
Go to preferences on whichever viewer you are using and select the graphics tab. Then choose the advanced or custom settings then make sure that ‘ambient lights’ and ‘advanced lighting’ are selected to get the maximum lighting effects.
IMPORTANT Remember that you will have to adjust your lighting if/when you change your graphic settings. The more use you make of lighting and shadows will mean that you will have to adjust your indoor lighting accordingly.
SLIDING & SWING DOORS


The most effective security to protect your privacy and possessions is to set to the land to private and invest in a top end security or land protector!
To open the door menu –
Touch door, hold & slide downwards.
The menu options will pop up, simply follow the easy to use instructions to set access, change close/open times etc. You will need to touch each door to operate and update the menu. It can sometimes take a few attempts to get the touch, hold and slide technique right but keep trying it definitely does work!
SET UP
The house comes as a single build (there are no separate, unlinked doors in any of my cottages!) so it is easy to place and move without the need for a rezzer
The accessories and furniture packs do come with a simple rezzer so just follow the instructions to rez and select store in the rezzer ‘Options’ menu which will remove the rezzer scripts and safely allow you to remove the rezzer
Each rezzer has been packed by the main door so simply place the rezzer by the doorway to help with placing the furniture correctly


MORE INFORMATION
VIEWING MESH BUILDS
This is a ‘100 %’ MESH build – so you will need a suitable viewer such as ‘Viewer 2’ or ‘Firestorm’ to be able to see the house properly. Some floors have been kept as prims to make it easier for you to make modifications to the layout and to optimise build physics.
See the additional notes coming up next for more information on what may happen to mesh builds when modified. Use the ‘search’ link at the bottom of the website to find more information, photos and information on making modifications to MESH builds.
MODIFYING POLYGON MESH BUILDS
There are some important differences between Mesh & Old Style Prim Building. Linden Lab support confirm that Mesh and Partial Mesh builds behave very differently in builds, which means that if you enjoy modifying the houses you buy it’s even more important to know what to do.
Only make modifications if you are confident in your building skills and always take a copy of the cottage.
This house is a 100% mesh build.
Here are some points to bear in mind when making modifications:
▪ The prim count for the cottage is the one as stated in its original state. I will provide Customer Support for any issues or help needed with the original build. Please send an email, notecard or contact me via my blog as IMs often get capped
▪ Mesh objects which are linked can have a much lower combined Land Impact than as separate individual items. This means that you will need to understand how to combine these objects effectively and how to optimise the physics to get the lowest possible LI
▪ Setting the physics for each object in the correct way will help to keep the LI down. Physics here just means the way that each object interacts with the Virtual World and Avatars, literally its physical properties in the Metaverse such as collision, whether you can walk on/through it etc. You will find the physics tab in ‘Edit Object’ >>> Features Tab. See further technical information around this on the Second Life Blog
▪ Additionally, the physics properties of objects can change once de- linked. Setting the physics incorrectly or changing them from the physics set in the original build can have an impact on your use of the building i.e. changes you make (either knowingly or by accident) may cause you to fall through floors, be unable to walk through arches, doorways etc, so be careful when making any modifications!
▪ Linden Lab also confirm that Prim count/Land Impact can also increase when scripts are added to the build and this is just the way that Mesh has been set up in Second Life
ALWAYS MAKE SURE YOU HAVE AN ORIGINAL COPY OF YOUR HOUSE !
That way if things do go horribly wrong (and they do for builders too) you’ll always have the original to start all over again.
Have fun with your new home and get in touch if you have any questions!


